Patchwork Christmas Tree Skirt

On Sunday I realized that my Christmas tree was lacking a skirt. I looked online for something simple and was inspired by an image I found featuring simple patchwork. I found a great tutorial and adjusted the size to fit my needs.

I couldn’t wait to use a small fat quarter bundle of Christmasy fabrics I had purchased at my LQS in August. I don’t know the makers of the fabrics, but I love the gentle metallics and the darker greens and reds mixed with blue.

I quilted it in a mix of straight and curvy lines, added a binding of dark emerald green batik, and was pleased at how quickly it all came together.

I debated putting ties on the opening, but my husband suggested buttons instead. I thought that was an excellent idea, so I added a couple of loops from the binding fabric and sewed on some pretty buttons.

Now our gifts don’t look quite so lonely.

I’m linking this to Amanda’s Finish It Up Friday and to Lily’s Quilts Small Blog Meet

Patchwork Loves Embroidery SAL – Secrets and Dreams Journal

Life has been very busy lately, so I am two weeks behind in completing this project from Gale Pan’s Patchwork Loves Embroidery. I took some liberties with Gale’s embroidery pattern, as I wanted the design to be less crowded. The beauty of Gale’s book is the abundance of designs from which to choose!

With inspiration and encouragement from the other ladies of the SAL, I am becoming more confident with my hand stitching and felt this was my best project to date. I really enjoyed picking out fabrics and thread and even ordered new embroidery needles from Jeana Kimball’s Foxglove Cottage. My old needles were purchased from a hobby store, and they were catching and pulling the fabric. After reading a post by Pretty By Hand’s Kristyn about her needle preferences, I ordered samples of different types of needles from Jeana’s store and have had much smoother sewing!

Since I have deadlines approaching on other quilting projects, I was going to make this my last SAL project. However I still want to make the needle folder as well as pincushions, so I will make the time.

Be sure to visit Martina’s blog for links to other SAL projects.

sunshinequilting

Stitch A Little Love Patchwork Loves Embroidery SAL

For this week’s Patchwork Loves Embroidery Sew-Along I choose to make Stitch A Little Love Sewing Folder. This folder finished at about 7 x 10 inches, although the pattern is for 8 x 10⁻¹/2 inches. For the main fabric I used pieces cut from a pillowcase I found at Goodwill. The remainder was from my stash.

The inside has pockets, and it is tied with a cord. If I make it again, I might add some lightweight fusible fleece to give it a little more body.

I plan to put add notions such as an embroidery hoop, scissors, embroidery thread, and a pattern before I give it to our church fall market to sell.

My stitching was improved this time by adding fusible interfacing before I worked the embroidery stitches. Amazing what works when I actually follow the instructions. I chose to add fabric hearts instead of stem-stitched hearts. My needle turn applique skills are not geared toward such small objects, so I used fabric glue to secure them and added a quilting stitch.

I enjoyed making this little folder so much I plan to make one of the other folder patterns included in Gale Pan’s Patchwork Loves Embroidery for our next link-up in two weeks.

Katy right before she pounced on the folder

Be sure and visit some of the other blogs that are joining me in the link-up today.

sunshinequilting

Garden Gate Patchwork

I recently discovered the blog of Christine at Patchwork Allsorts and am drawn to her pretty embroidery. When I saw this beautiful stichery I decided I had to buy one of the double stitch patterns from Mountain Patchwork. During the month of September they have free shipping!

Christine has a stash of Tilda fabrics, which are gorgeous fabrics not readily available here in the States. I have to admit I’m envious of her stash. I started to buy a few pieces on Etsy, but in the end I decided to use some of the “unloved fabrics” that had been weeded out of my stash during The Purge a few weeks ago. They are batiks which attracted me initially, but I didn’t love them anymore. However once they were cut and sewn together I loved them again.

I haven’t hand sewn for a long time, and my stitches show it. Sewing a straight line is not as easy as it used to be, and my embroidery stitches look spidery to me. But I decided it adds to the charm. For the double stitch thread I used variegated Superior Rainbows with shades of lavender, sage green, and pink, and for embroidering the flowers, ribbons, and stems I used Cosmo thread.

I am working on re-purposing/refinishing a frame for it and will post a final picture. Thanks to Christine for answering my numerous questions about this project!

Cinnamon Delights Bag – Patchwork Loves Embroidery SAL

I recently purchased the Kindle version of Gale Pan’s Patchwork Loves Embroidery so that I could join a Sew-Along for the book. Martina at Sunshine Quilting is hosting, and today is the first link-up for completed projects.

I chose the Cinnamon Delights Bag and was able to use fabric from my “de-stash” purge that was in my “unloved” pile. The blue is a batik, and for some reason when I first started collecting fabric, I was fascinated with batiks. Now, not so much. However, the fabrics took on new life as they were transformed into a bag!

The inside lining is a tiny bit bulky, so next time I make this I will cut the lining just a smidge smaller.

The bag combines hand quilting with machine stitching, and in spite of a few minor hitches (and hidden mistakes) I thoroughly enjoyed making it. Now I am eager to choose my next project.

I am linking to Sunshine Quilting’s Patchwork Loves Embroidery Sew Along 2014

sunshinequilting

Christmas Table Topper Finished

My Christmas table topper is finally completed. I blogged about it in this post – how it was my first real project and how it got set aside and how almost four years later I rediscovered it and decided to finish it.

Besides moving twice in those four years, there were a couple other reasons I didn’t finish it. Although I really liked the teacher of the beginning quilting class I took in 2010, she was a member of the “points police” and made us redo any blocks that had less than perfect points. . I never had to redo any of my piecing, because I spent hours making sure my points were perfect (although now I see some errors on my blocks). I am grateful to my teacher for instilling good “points ethics”, but it created a kind of dread when I thought about finishing. And I was very nervous about quilting it, since the class did not include any quilting instruction. So it sat in a basket.

It wasn’t until I started examining pictures on the blogs of experienced quilters that I realized my points did not have to be perfect and my quilting was going to look good to a non-quilter no matter how elementary it looked to me. The tide began to turn, and now I love every part of making a quilt.

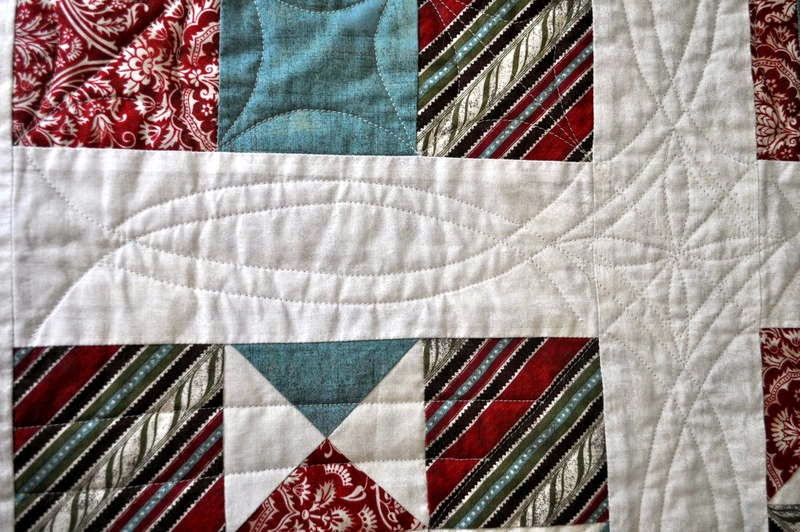
I quilted with no plan, but I am pleased with the way it turned out. Each block has its own quilting pattern. The only thing I would do differently now would be to rearrange the blocks to help balance the two lighter blocks with the two darker blocks. It finished at 26-1/2 inches square.

Center

Simple flowers and leaves and mazes

Each block quilted with different pattern

My version of the Christian symbol of the fish on the sashing

Binding is one of Moda’s Fruitcake line

I toyed with the idea of donating this to our church fall market, but I think I would rather keep it as a reminder of my first class and use it for Christmas. I am linking it to Rachel’s Purge-Along and to Lily’s Quilts Small Blog Meet.

the Purge

Small Blog Meet

Here Kitty Kitty Coin Purse

Part of the fun of joining Stitched in Color’s Purge-Along was finding things hidden under the mess in my closet that I had purchased for projects, and I discovered purse frames and fabric I had intended for purses. Since my youngest granddaughter turned 11 today, I decided yesterday to make her a coin purse to contain the cash we gave her. I followed the tutorial posted by Bethany on Sweet Bee Buzzings blog and it all went together in about 2 hours.

I made a little card with scrapbooking paper

The “wrapping” was a decorative take-out box I got at Hobby Lobby

The purse frame was a purchase from Etsy

The outer fabric was Michael Miller’s Here Kitty Kitty

The inner fabric is from In The Beginning Fabrics

My impromptu decision meant that I didn’t have everything recommended for the best results. I didn’t have fusible fleece and used a piece of felt instead, and the extra thickness made sewing and turning a bit difficult. I had foam glue instead of fabric glue, but it seemed to hold well. Bethany’s instructions and photos were great. I was clueless about purse-making, and I will definitely use her tutorial again.

My granddaughter was very happy with both the purse and the cash. I also made cupcakes for her, and those will be on another post.

the Purge

Rainbow Quilt Finished!

I am very happy with this quilt! I finished it on Saturday and gave it to the pastor on Sunday. In the card I let her know that I am still working on the label and will sew it on for her when it is ready. I’ve decided to name the quilt “You’re the Rainbow To My Cloud”, from a quote by Maya Angelou.

The back of the quilt was a mix of fabric blocks using fabrics from the quilt front, plus a tie-dye fabric that brought all the colors together. I thought the swirl in the pattern complimented the “motion” of the pinwheels on the front.

Color range red, orange, yellow, green

Color range blues, purple

Pinwheels

The binding was the same fabric as the darker fabric on the pinwheels.

I quilted free-style horizontal waves with the walking foot. With the exception of a small glitch, I loved the way it turned out.

Quilt front

Thanks to my patient quilt-holding husband, who begged me not to include his legs.