Tuesday Archives – Harvest Button Napkin Rings

Today’s theme for Val’s Quilting Studio Tuesday Archives linky party is “Buttons”, and the photo above shows the Modge-Podged buttons I made for some crocheted napkin rings last November. My original post is HERE.

The napkin rings were a gift for a blogging friend, and they were the first crochet project I had attempted in years!

Be sure and click on Val’s link below to check out archived goodies from other bloggers!

Val's Quilting Studio

Baby Girl Pillow

With a few scraps left over from the baby quilt and bunting for our soon-to-be-born granddaughter (anticipated date April 11, I decided to make a last minute pillow the night before my daughter’s baby shower!

I had nothing more than an idea for a fussy-cut center block, so I just put it together using fabrics from the original quilt.

My son-in-law painted the nursery a soft gray, so I thought the Simply Simple Silver (Art Gallery “Littlest” collection) would make a nice background to the fussy-cut block.

I had almost enough Ditsy Radiance (NouvElle collection by Pat Bravo)for the backing, so I supplemented with a Grunge Basic and made a simple envelope-style back. You can tell by the gap it is really stuffed!

Quilting was stitch-in-the-ditch for the fussy-cut block and following the “waves” and straight vertical stitching for the remainder. (Why do I only notice the loose threads when I’m posting the photo?)

All the “Grandma handmades” prior to wrapping.
I got it all stuffed into one bag
Gifts to our daughter and son-in-law from Mom and Dad
I made a little card for the top of one gift with more fussy-cuts and a square antique lace doily
My daughter and me at the shower

There was a “name reveal” during the shower, and I look forward to sharing that with you! Now I can make the label for the quilt and sew it on while I am staying with my daughter after Baby Girl is born.

Quilting is more fun than Housework

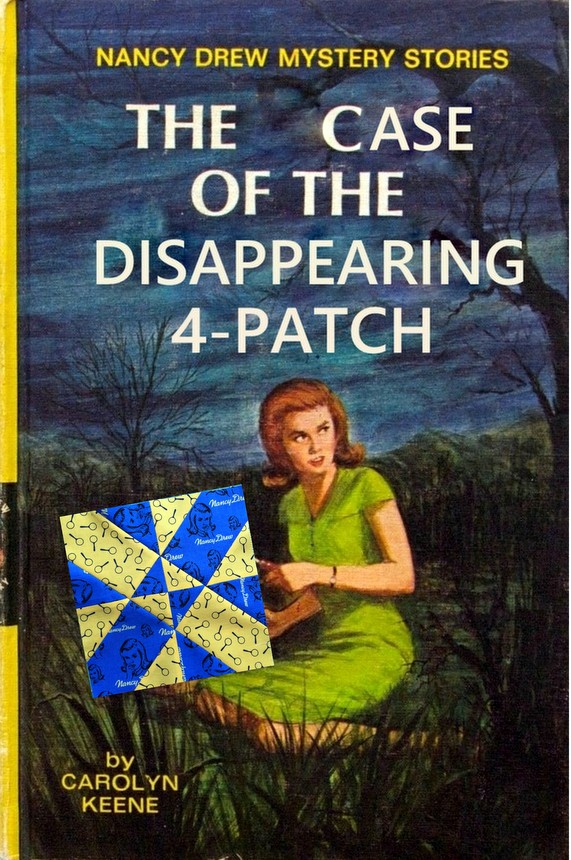
The Case of the Disappearing 4-Patch

This really is a post about a Disappearing 4-Patch block, but I couldn’t resist making a mystery out of it by taking liberties with the cover of The Secret of the Old Clock! I discovered Nancy Drew books when I was 10, and my friends and I pretended to be the characters in the mysteries. I sold chicken eggs to buy the newest books at the tiny bookstore in my small town. And to this day I get a thrill of excitement when I see those old book covers. My favorites were The Password to Larkspur Lane and The Whispering Statue.

Since I first started quilting I’ve been fascinated with “disappearing” 4-patch, 9-patch, and 16-patch blocks and their many variations, so this “disappearing 4-patch with a twist” on Pinterest was hard to resist. I found the tutorial on the blog of What Comes Next?. I decided to try my own tutorial, but you can refer to the original tutorial if you get confused. Click on the pictures for a closer look.

Contrasting colors work best. In keeping with the “mystery” theme, I chose two light and two dark 5-inch charm squares from Moda’s Get A Clue With Nancy Drew collection.

Sew 4-patch together as normal
Place a mark 2 inches from each of the 4 corners
Using the marks as a guide, place ruler as indicated and make diagonal cuts as pictured.
A rotating cutting board is helpful!
The cuts will yield pieces like this
Here is where the “twist” comes into play:
In the upper right corner, switch “a” with “b”
In the lower left corner switch “c” with “d”
Now take the center piece and give it a turn
When the “twists” are completed, your sections will look like this
Each 3-piece section is sewn together
The three sections are sewn together, matching the center seams
Trim the block
My block finished at 8 inches square

You can use different sizes of squares and also make your diagonal cuts at measurements other than 2 inches. The variations are endless!

I am sharing this post with Val’s Quilting Archives and Life a Colorful Life Really Random Thursday.

Val's Quilting Studio

Baby Girl Bunting

My granddaughter is due in April, and my daughter and son-in-law have been working to get everything ready! She requested a “bunting” to hang across a little ceiling alcove in the room they are converting to a nursery. She sent me a photo of an Etsy bunting she liked and the measurements of the alcove and away I went!

Armed with a Whitney Sews You Tube video and Whitney’s free pattern, I created a bunting that I think will serve the purpose!

I adjusted Whitney’s template to a larger size and used leftover fabric from baby girl quilt. I like Whitney’s pattern because the seam is in the back of the “flag”, rather than on the sides like many other bunting patterns I found.

I cut a 2-inch wide piece of gray and white diagonal striped fabric (it is lighter than it appears in the photos) for the “stringer”, sewed it on like quilt binding, and made a small loop on either end, for hanging.

I sewed the stringer around cord to give it a little weight.

Now I’ve got my fingers crossed it fits the space!

A Mug Mat for My DIY Guy

After I made myself a mug rug, I decided to surprise my DIY Guy with one. “Mug Rug” didn’t sound quite manly enough, so his is a Mug Mat.

His favorite “OU Sooners” coffee mug is crimson, so shades of red, black, and gray will compliment it!

This time I did regular straight-line quilting instead of quilt-as-you-go. After taking my usual long time choosing fabric, I finished it all up in less than an hour – almost instant gratification!

The back is solid red. Although it appears blue in the photo, the binding is a Kona gray.

I’m linking to Cynthia’s Oh Scrap!

RSC 2016 – Scrappy Curved Log Cabin Block

Angela at So Scrappy is hosting her annual Rainbow Scrap Challange, and I’ve decided to join the fun! You may follow the monthly color choices and/or design plan for a scrappy sampler, and she has a tutorial for beautiful Twinkle Stars. For January the color is blue.

Last summer I made a eight scrappy curved log cabin blocks using this tutorial for scrappy offset rainbow blocks by Cynthia Brunz at Quilting Is More Fun Than Housework. Yesterday I remembered them and decided to resurrect and complete the blocks for RSC 2016. Each completed rainbow “circle” is composed of four blocks, and I had made one block each of blue, aqua, hot pink, red, orange, and green. I pulled more scraps for three more blue blocks and finished them last night.

My “cheat sheet” for Cynthia’s instructions!

Can’t wait to see what next month’s color will be! And after seeing Cynthia’s version of Twinkle Stars, I may have to make a few of those blocks too!

There’s still one more day to enter my Giveaway!

I’m linking to Scrap Happy Saturday and Oh Scrap!

First Finish of 2016 – QAYG Mug Rug

Taking inspiration from Diann’s tutorial on Little Penguin Quilts, I not only made my first mug rug but also my first quilt-as-you-go project! Diann’s beautiful mug rug was featured as a guest post on Cyndy’s Oh Scrap! back in February, but I didn’t see it until I read Diann’s Best of 2015 post.

Last year I had every intention of making a mug rug like Christine’s and even downloaded the pattern from Craftsy but I forgot about my plans as the year progressed. I loved the look and simplicity of Diann’s so I decided to try it first.

I used scraps for the front and for the binding and pulled a larger piece from my stash for the back. The amount of time I spent picking out scraps to use was ridiculous – I had a lot of trouble deciding, so maybe that’s a sign I need to make more! Although I had many stops and starts removing stitches and re-positioning fabric, I finally got the hang of things and finished in about two hours.

I followed Diann’s example and quilted diagonal lines

I finished it yesterday evening, and loved having it on my sewing table waiting for me this morning! I’m linking to Cyndy’s Oh Scrap!

Don’t forget to enter my End of Year Giveaway!